Electric Bike Wheelie Guide: Master The Art of Torque & Balance
Important Safety Note: Beginners are strongly advised to ride with an experienced rider and wear full protective gear before attempting the techniques in this guide.
In the world of high-performance electric mobility, the wheelie is more than just a street stunt, it is the ultimate demonstration of a rider’s connection with their machine. While traditional mountain bike wheelies rely on physical "grunt" and explosive leg power, this electric bike wheelie guide focuses on a much more sophisticated skill: Electronic Torque Management.
Whether you are navigating the streets on a nimble commuter or piloting a high-torque performance machine, the front wheel is always eager to rise. The difference between a controlled 'manual' and a dangerous 'loop-out' isn't about the size of your motor, it’s about your mastery of the machine's response and your own braking finesse. This electric bike wheelie guide is designed to refine your technique and elevate your riding skills to a master level, regardless of your bike's power output.

1. The Physics: Power & Body Position
To master the skills in this electric bike wheelie guide, you must first understand the invisible forces at play. An electric motor functions fundamentally differently than an internal combustion engine.
1.1 The "Instant Power" Factor
Unlike a gas engine that needs to "rev up" to find its power, an electric motor is like a light switch. The moment you touch the throttle, 100% of the bike's pulling power is available. We call this Maximum Torque at Zero RPM. Because this force is instantaneous, the bike reacts the very millisecond you twist your wrist. This is why a surgical, gentle touch is more important than a big pull.
1.2 The Center of Gravity (The Rider)
Your rear axle is your pivot point (the fulcrum). If you lean over the handlebars, you are physically fighting the motor. To make the front end "light," slide your hips to the very back of the saddle. This shifts your Center of Gravity (CoG) behind the axle, allowing the motor to lift the bike with significantly less battery drain and effort.
2. Technical Setup: Using This Electric Bike Wheelie Guide for Tuning
Performance riding requires specific mechanical adjustments to give you the best "platform" for balance.
2.1 Tire Pressure: Your Secret Stabilizer
Standard tires are often over-inflated to reduce rolling resistance, but this makes the bike 'twitchy' on one wheel. To stabilize your balance, consider lowering your rear tire pressure to create a flatter, more stable footprint [Approximately 20–25 PSI]. A softer tire acts like a stabilizer, helping the bike stay vertical rather than tipping side-to-side.
2.2 The "Golden Rule" of the Rear Brake
Always cover your rear brake. It is your "escape button." Before you ever attempt to lift the wheel, practice "The Safety Tap." Ride at a slow pace, pop the wheel just two inches, and immediately slam the rear brake. You must train your muscle memory to react with the brake, not by jumping off the pedals. High-performance models equipped with hydraulic rotors provide the necessary "bite" to pull you back from the brink of a loop-out instantly.

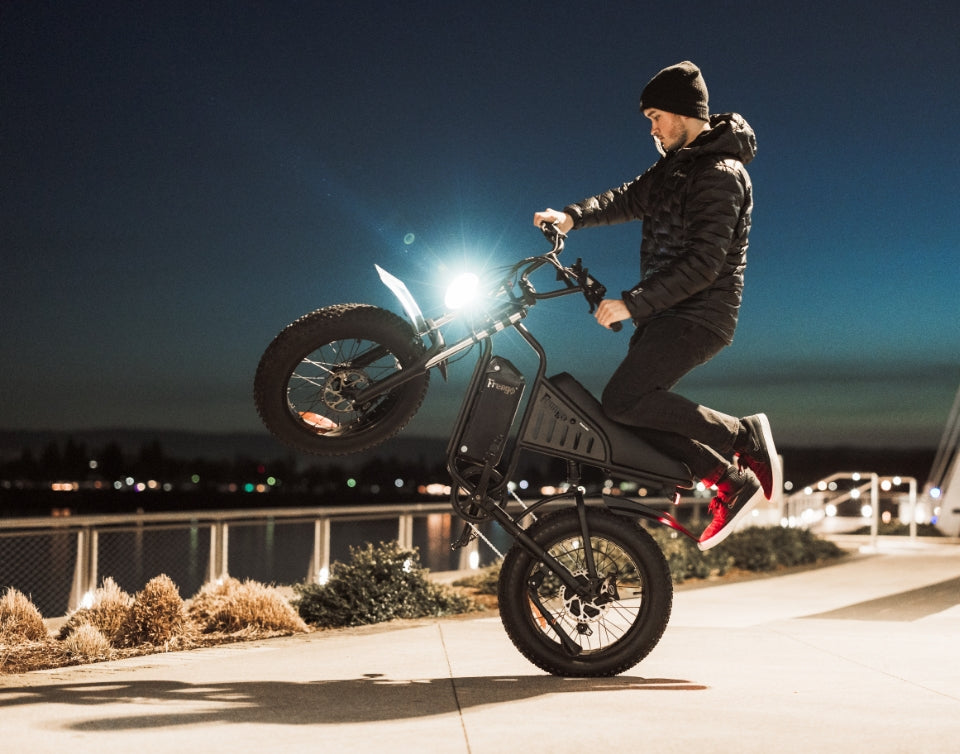
3. Benchmark: The Freego X2 Pro
A common question is whether a specific model is required to perform wheelie stunts. While every bike in our lineup is capable of lifting the front wheel, the Freego X2 Pro serves as our gold-standard benchmark. Because of its high-output motor and robust 60V battery architecture, the X2 Pro provides a sustained "surge" that makes the lift predictable. Its fat tires offer a forgiving lateral balance point, meaning it's less likely to tip sideways than a thin-tired mountain bike.
Consistency Across the Fleet: If you are riding a 48V model, the physics remain the same, but you will rely more on dynamic body weight shifting and timing. While 60V systems offer "sustained" power at higher speeds, all our models are equally capable when the rider uses the correct 5-step technique. Torque is the muscle, but your timing is the conductor.
For beginners looking for a visual walkthrough, you can watch this wheelie tutorial from E-Bike Dad featuring the Freego X2 to see these techniques in action.
4. The 5-Step Progression to Mastery
Step 1: The Tactical Stance Start at a steady jogging pace [5-8 MPH]. As you see in the video, Acee stays seated to keep weight over the rear motor. Crucial: Keep your index finger resting on the rear brake lever at all times—this is your "panic button" to prevent flipping.
Step 2: The Pre-Load (The "Squish") Watch closely as he approaches the camera: he pushes down hard on the handlebars to compress the front forks. This "Pre-Load" stores energy in the suspension, which is vital for lifting the front end of a heavy e-bike like the Freego X2 without straining your back.
Step 3: The Snap (The Lift) The moment the forks begin to rebound (push back up), give the throttle a 25% "blip." Notice how the wheel lifts effortlessly. This "Snap" uses the motor's instant torque to do the work so you don't have to pull with your arms.
Step 4: The Chase (Throttle Modulation) Once the wheel is up, the bike will naturally want to drop. Follow Acee’s lead and use small, rapid "puffs" of throttle. Avoid one long pull; instead, use quick pulses to "chase" the wheel and keep it at a consistent height.
Step 5: The Rocking Chair (The Balance Point) The goal is to reach the "weightless" zone. If you see the bike go too high in the video, notice how a quick tap of the rear brake brings it back down safely. This is the Rocking Chair Zone, where you use micro-adjustments to stay balanced rather than gaining more speed.
As seen in the tutorial below, the 'Snap' happens at a steady pace of 5-8 MPH. Watch how he uses the rear brake to 'catch' the balance point and give best wheelie stunt.
Tutorial by Acee - Snap & Catch Technique
5. Troubleshooting & Pro-Fixes
- The Side-Lean Correction: If the bike falls to the side, you are likely "stiff-arming." If you pull with your arms, you'll pull unevenly. Let the motor do the work while your arms stay relaxed. Grip the frame with your knees to center your weight.
- Overcoming the "Loop-Out" Fear: This electric bike wheelie guide emphasizes the "Safety Tap." If you jump off the bike too early, you haven't trusted your brake. Spend 10 minutes practicing the "Safety Tap" (Step 2.2) until your brain knows the brake will save you.
- Taming the "Whiskey Throttle": This happens when you grip the bars too tight. Hold the grips lightly and move your hand further out toward the handlebar end to allow for finer, more surgical throttle control.
6. Crucial Maintenance Checklist
- Axle Nut Security: The 'snap' of electric torque creates massive rotational force. Ensure your rear axle nuts are torqued to a high-performance standard, typically 30–40 Nm for aluminum frames or up to 50–60 Nm for heavy-duty hub motor setups with steel dropouts. If these nuts are loose, the axle can 'spin out' and destroy your frame.
- Spoke Tension: Landing a wheelie puts several times the bike’s weight onto the rims. Tap your spokes; they should "ping" with a clear note. A dull "thud" means the spoke is loose.
- Thermal Management: Constant "throttle snapping" generates rapid heat in the motor. If you feel the motor casing getting hot, give the bike 10 minutes to cool down to protect the internal magnets.
7. Conclusion
The journey to the perfect wheelie is the most rewarding skill you can develop as a rider. It forces you to understand your bike's power delivery, braking limits, and balance better than any other exercise. By mastering the "Instant Power" of your motor and the physics of your own body weight, you become more than just a commuter, you become a pilot of your machine. This electric bike wheelie guide is your roadmap to performance riding. Stay safe, always wear a helmet, and we'll see you on the back wheel. To see exactly how a controlled lift looks in action, watch this real rider clip proving that consistent practice with the right techniques makes wheelieing possible.